

本页目录
我们使用 WordPress Settings API 添加完自己的选项后,为了方便主题用户便捷的找到需要设置的地方,这个时候就可以给你的设置项目添加一个小铅笔,主题用户点击小铅笔即可直接到设置的地方,十分方便,跟着这次的 WordPress 开发教程一起来学习吧。
在这里我以 WordPress 自带的 2019 主题来做演示。
效果实现:
首先,我们需要添加一个设置项目,在 2019 主题根目录下的functions.php文件的<?下面添加以下代码:
//添加自定义设置选项function npcink_customize_register( $wp_customize ) {
//给相关设置项目加小铅笔
if ( isset( $wp_customize->selective_refresh ) ) {
//One $wp_customize->selective_refresh->add_partial( 'npcink_sections_text_one', array( 'selector' => '.1-1', 'render_callback' => 'lifet_customize_partial_npcink_sections_text_one', ) );
//Two $wp_customize->selective_refresh->add_partial( 'npcink_sections_text_two', array( 'selector' => '.1-2', 'render_callback' => 'lifet_customize_partial_npcink_sections_text_two', ) );
}
//----------------------------------------------------------------------------- //添加主题设置面板,ID = npcink_options $wp_customize->add_panel( 'npcink_options', array( 'title' => __( '添加小铅笔演示', 'npcink' ), 'description' => __( 'Npcink出品', 'npcink' ), 'priority' => 30, 'capabitity' => 'edit_theme_options', ) );
//添加文本设置节,ID = npcink_sections_text $wp_customize->add_section('npcink_sections_text', array( 'title' => '文本设置', 'description' => '主题的文本设置', 'panel' => 'npcink_options', ) );
//文字设置:one,ID = npcink_sections_text_one $wp_customize->add_setting('npcink_sections_text_one', array( 'default' => 'Npcink 荣誉出品', ) ); $wp_customize->add_control('npcink_sections_text_one', array( 'label' => '文本设置:One', 'section' => 'npcink_sections_text', 'type' => 'text', ) );
//文字设置:two,ID = npcink_sections_text_two $wp_customize->add_setting('npcink_sections_text_two', array( 'default' => 'Npcink 荣誉出品', ) ); $wp_customize->add_control('npcink_sections_text_two', array( 'label' => '文本设置:Two', 'section' => 'npcink_sections_text', 'type' => 'text', ) );
}add_action( 'customize_register', 'npcink_customize_register' );保存上面的代码,我们就可以在网站后台 → 外观 → 自定义中看到我们添加的新选项:添加小铅笔演示。
为了方便看到演示效果,我们在主题根目录下的header.php文件底部添加以下代码:
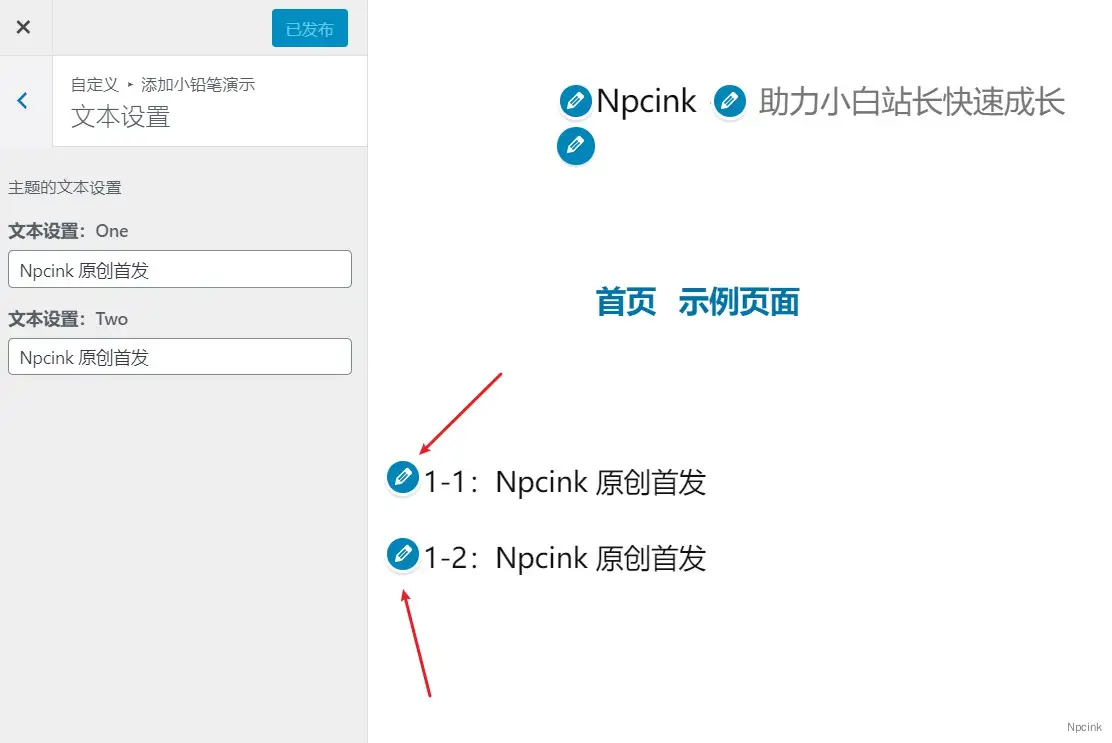
<dl style="padding: 1em;"> <dd class="1-1">1-1:<?php echo get_theme_mod( 'npcink_sections_text_one', 'Npcink荣誉出品' ); ?></dd> <dd class="1-2">1-2:<?php echo get_theme_mod( 'npcink_sections_text_two', 'Npcink荣誉出品' ); ?></dd></dl>注意这里的 class :1-1、1-2
效果如下图:
代码解释:
如果您阅读了我之前发布的文章,那么在这里您需要注意这几点:
一:
在做效果演示时我给 dd 标签添加了 CSS,分别是 1-1、1-2,这将有助于接下来的小铅笔进行定位。
二:
我新添加了一段 if 判断语句:
if ( isset( $wp_customize->selective_refresh ) ) {
//One $wp_customize->selective_refresh->add_partial( 'npcink_sections_text_one', array( 'selector' => '.1-1', 'render_callback' => 'lifet_customize_partial_npcink_sections_text_one', ) );
//Two $wp_customize->selective_refresh->add_partial( 'npcink_sections_text_two', array( 'selector' => '.1-2', 'render_callback' => 'lifet_customize_partial_npcink_sections_text_two', ) );
}简化后为:
if ( isset( $wp_customize->selective_refresh ) ) {
$wp_customize->selective_refresh->add_partial( '控件ID', array( 'selector' => '添加的CSS', 'render_callback' => 'xxx_控件ID', ) );
}这一段的意思就是给指定的 CSS 处添加小铅笔。
以上代码均可正常使用,但其具体实现原理我是一概不知,仅供参考,如果能够帮助到您那是最好啦。
举一反三,相信你已经知道了如何添加小铅笔了,如果你还有疑问的话,欢迎在评论区留言交流。
补充(参考):
你搜 callback 里的函数
没有那个是不起作用的
这个 callback 是要返回修改后前端展示的结果的
基于 留的 class 找元素直接替换内容
你文章没提这个
别人只写个函数名 啥作用没有
这个 render_callback 跟 id 没半毛钱关系
完全是可以 自定义命名的